Vader's Vault Combat Class Saber User's Guide
This user's manual is meant as an operations and maintenance guide for the Combat Class Saber from Vader's Vault. There is a lot you can do as far as customizing the settings and parameters of the Crystal Focus soundboard, for more information please download and use the Crystal Focus 10 manual from plecterlabs.com for aid in doing so and don’t forget to make a backup copy of your SD card contents.
This custom saber is meant for active use. The end user accepts all liability for property damage or personal injury incurred during the use of this product. If used in combat, this saber is meant for, and warranted against use with other custom sabers. It is not meant for bashing tress, power poles, cars or other various inanimate objects.
The Combat Class saber you have purchased is operated by 2 switches. On most models, these switches are a 16mm Anti-vandal switch, and small tactile "auxilliary" switch (located 180 degrees from the 16mm AV switch). The 16mm AV switch is the main activation button, and the small tactile switch is used for accessing special FX sounds, menu navigation, and used in conjunction with the main switch for accessing the Spectrum feature (color change and blade FX change)
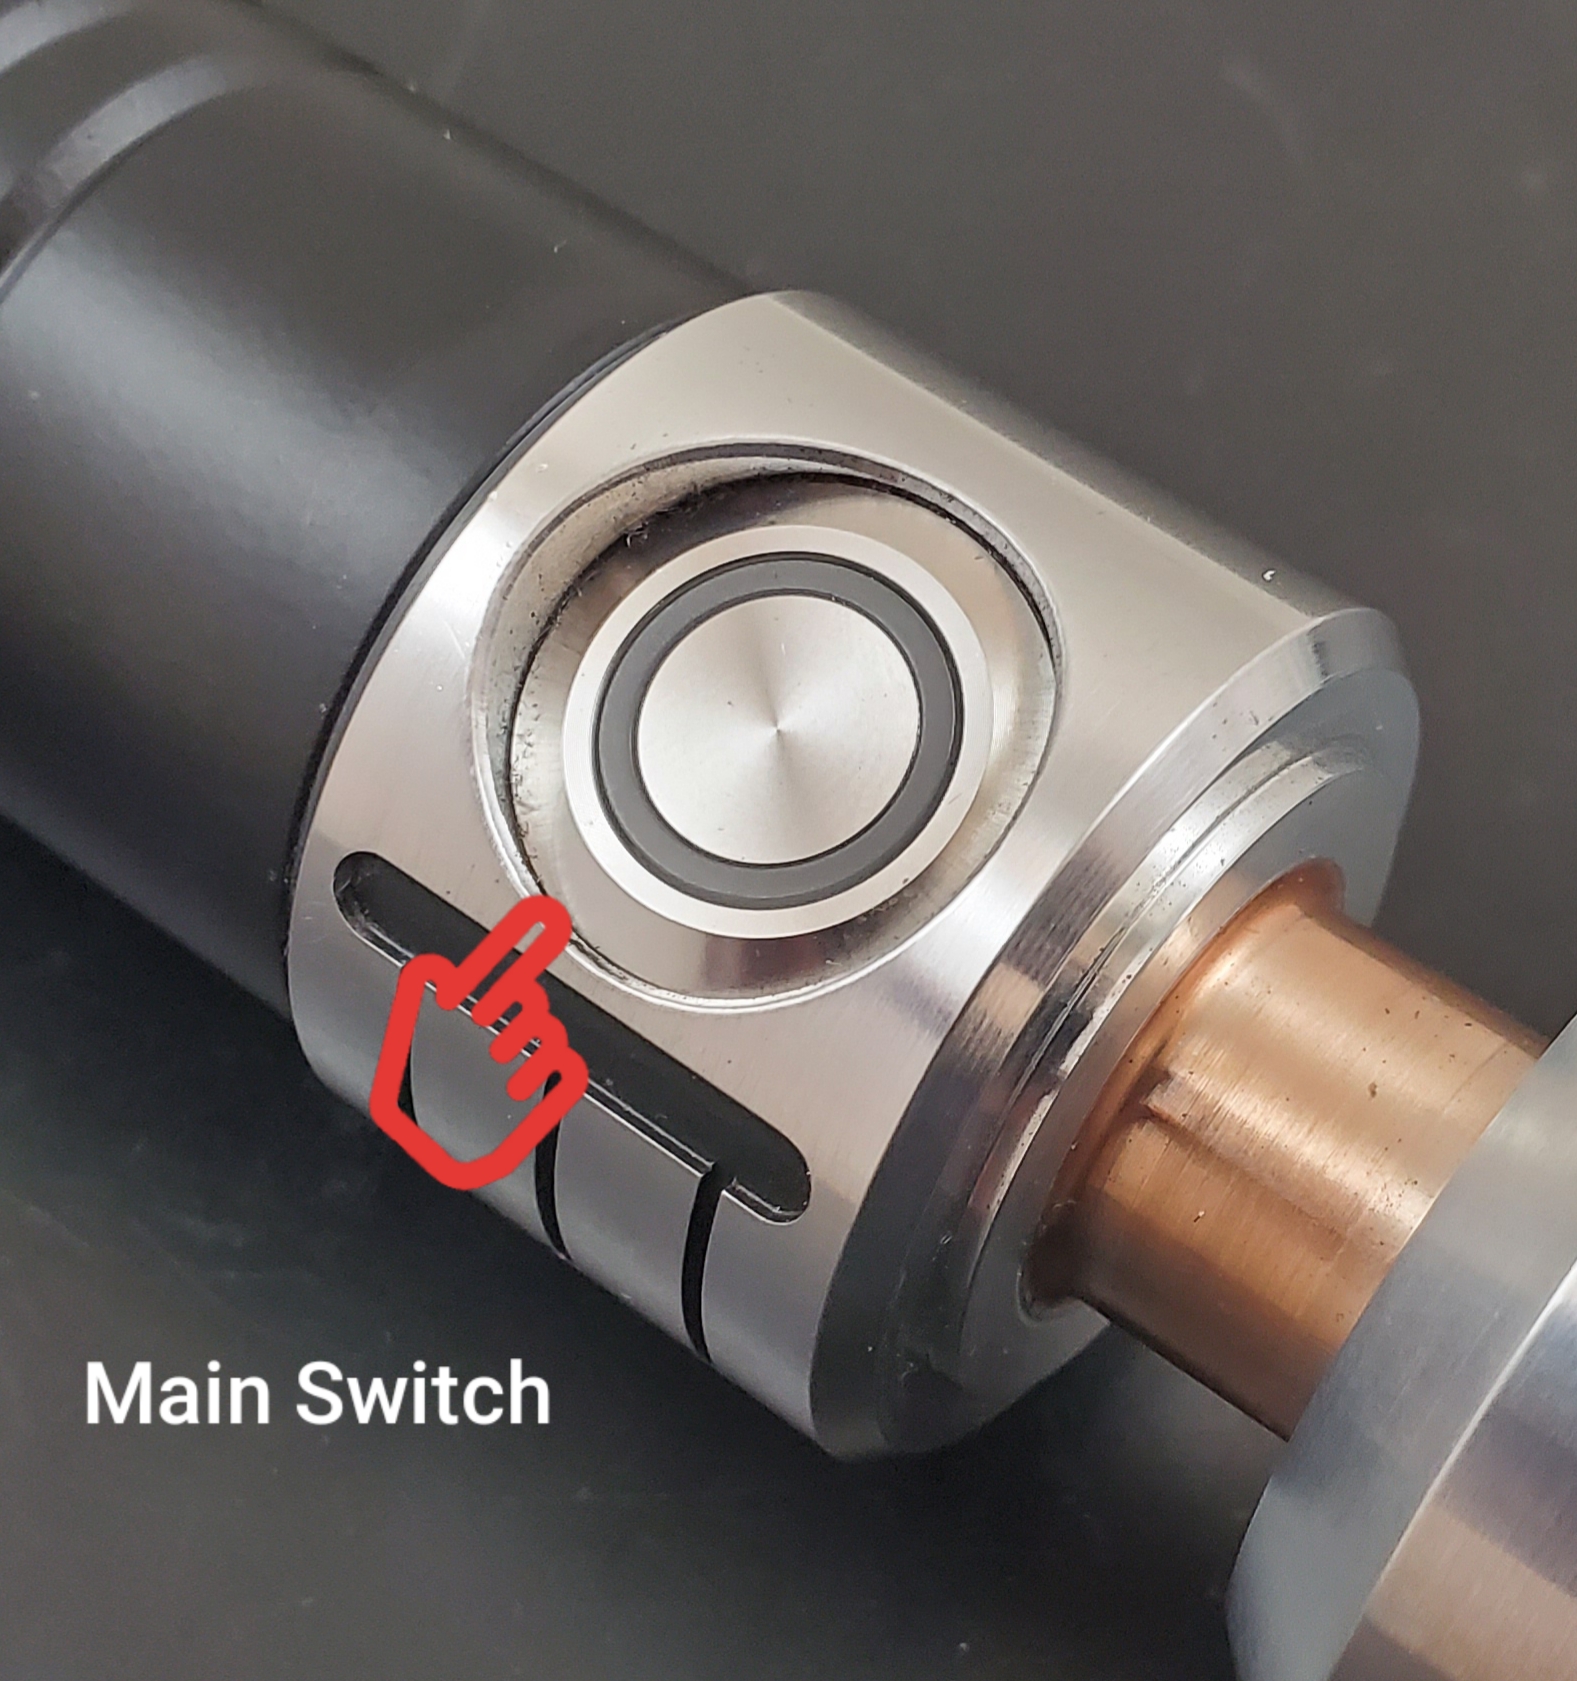
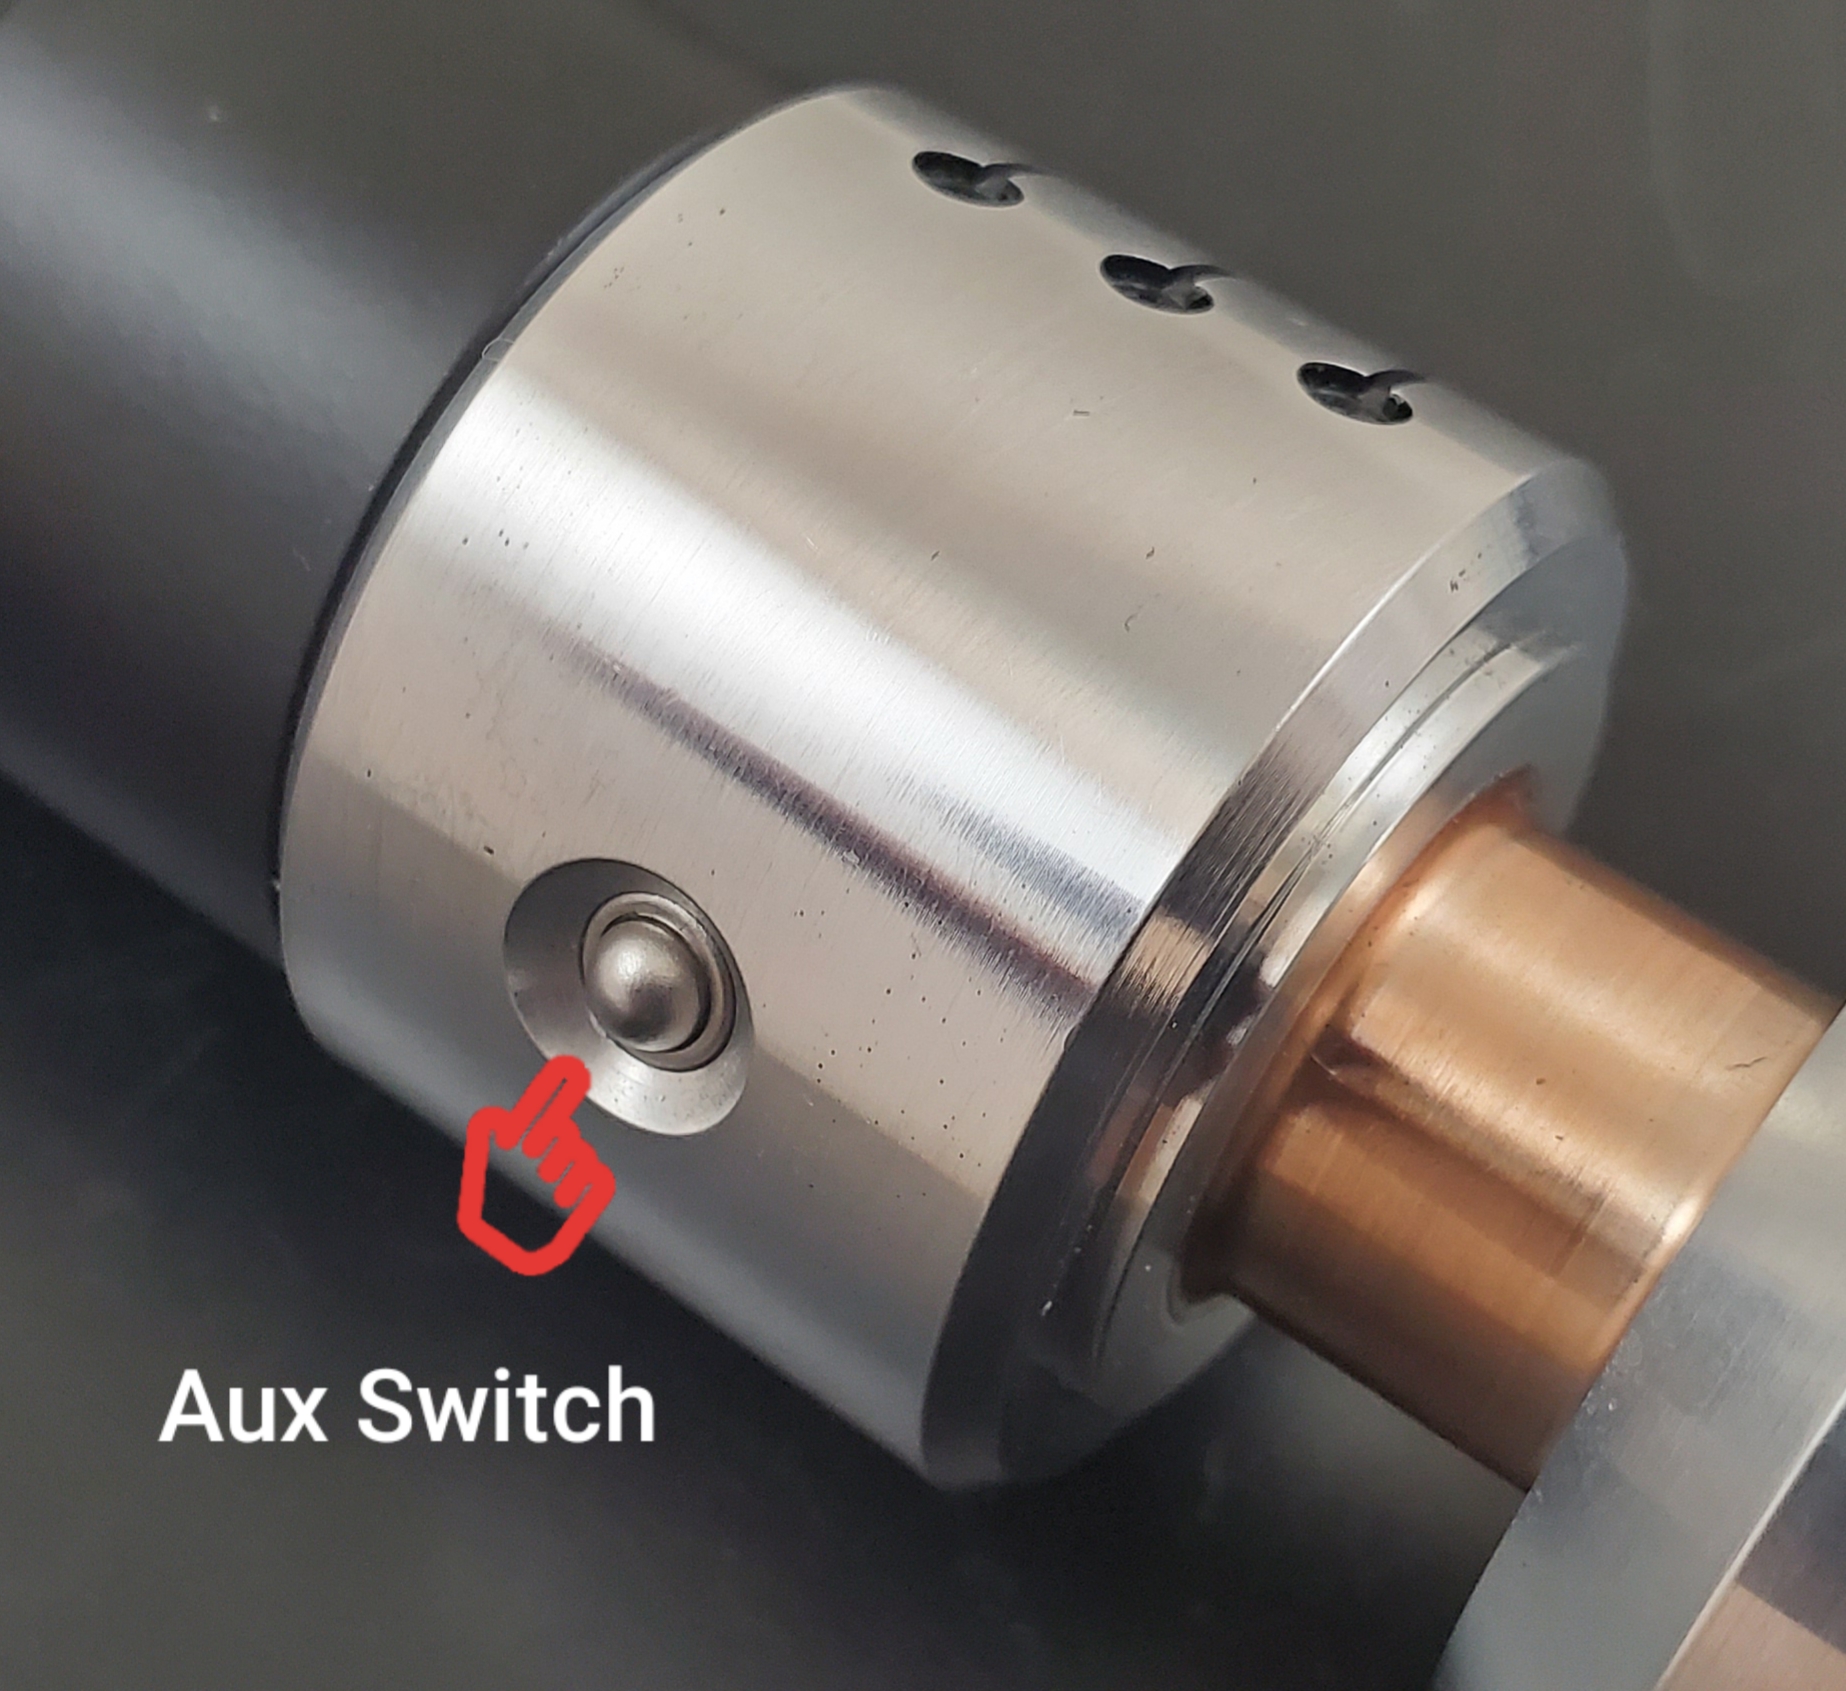
On models where there is no 16mm AV switch, there are usually 2 smaller switches in which case, the more forward switch (towards the blade) is going to be your main activation switch.

To ignite the saber, simply press and release the main switch. To turn the saber off, press and hold the main switch until it turns off. While the saber is on, tapping the auxilliary switch will activate Blaster FX sounds per press. Pressing and holding the aux switch will activate a 'lock up' or 'cutting' sound. Pressing the aux switch while executing a motion such as a swing or clash will activate various sound effects such as force push, force lightning etc. depending on the individual 'sound font' currently active on the saber. When the saber is 'off', pressing and holding the aux switch will activate the vocal 'font' menu. This is where you can change the sound font you wish to use. Once you hear the "Sound bank selection" vocal cue, you can tap the aux button to scroll forward, or tap the main switch to go backward in the menu. Each font has a vocal call out so that you know what font it is. Once you reach the desired font, press and hold the aux switch until you hear it 'boot' the font. You may now activate the saber.
Spectrum:
Spectrum is the feature that allows the user to switch between blade colors and special FX on the fly, without the need to hook it up to a computer or app. This feature does require either a Plecter Pixel or an RGB Suncrusher option. Single color sabers are not set up to use this feature. You can have a choice from 16 colors and 16 effect profiles using this feature. On Plecter Pixel equipped sabers, some blade effect profiles come preset for you to enjoy. To activate Spectrum, press and release both the main activation and the aux button simultaneously. You will hear the "Spectrum" voice announcement. You can then move the saber in a fan motion to select from the colors like a color wheel. You will hear 'clicking' between each color preset to provide an audible guide. When you reach the color you want, you can simply tap the aux button to lock in the color or..
With a long press instead of a tap of the aux button during the color selection, you gain access to the "Blade Profiles", also announced with an audible cue. This gives the user access to any pre-programmed blade effects. Using the same motion to scroll through the blade effects, simply tap the aux button to select, or press and hold to return to color selection.
Blades:
When you recieve your saber, the blade is not installed for shipping and will require you to insert it into the emitter before use. Since we use 2 different lighting technologies, there are 2 different blades and though installed in a similar manner, have some differences that are important to go over.
When you get your saber, it also comes with a hex wrench (3/32 for Combat Class) that is used to tighten and loosen the blade retention set screw.
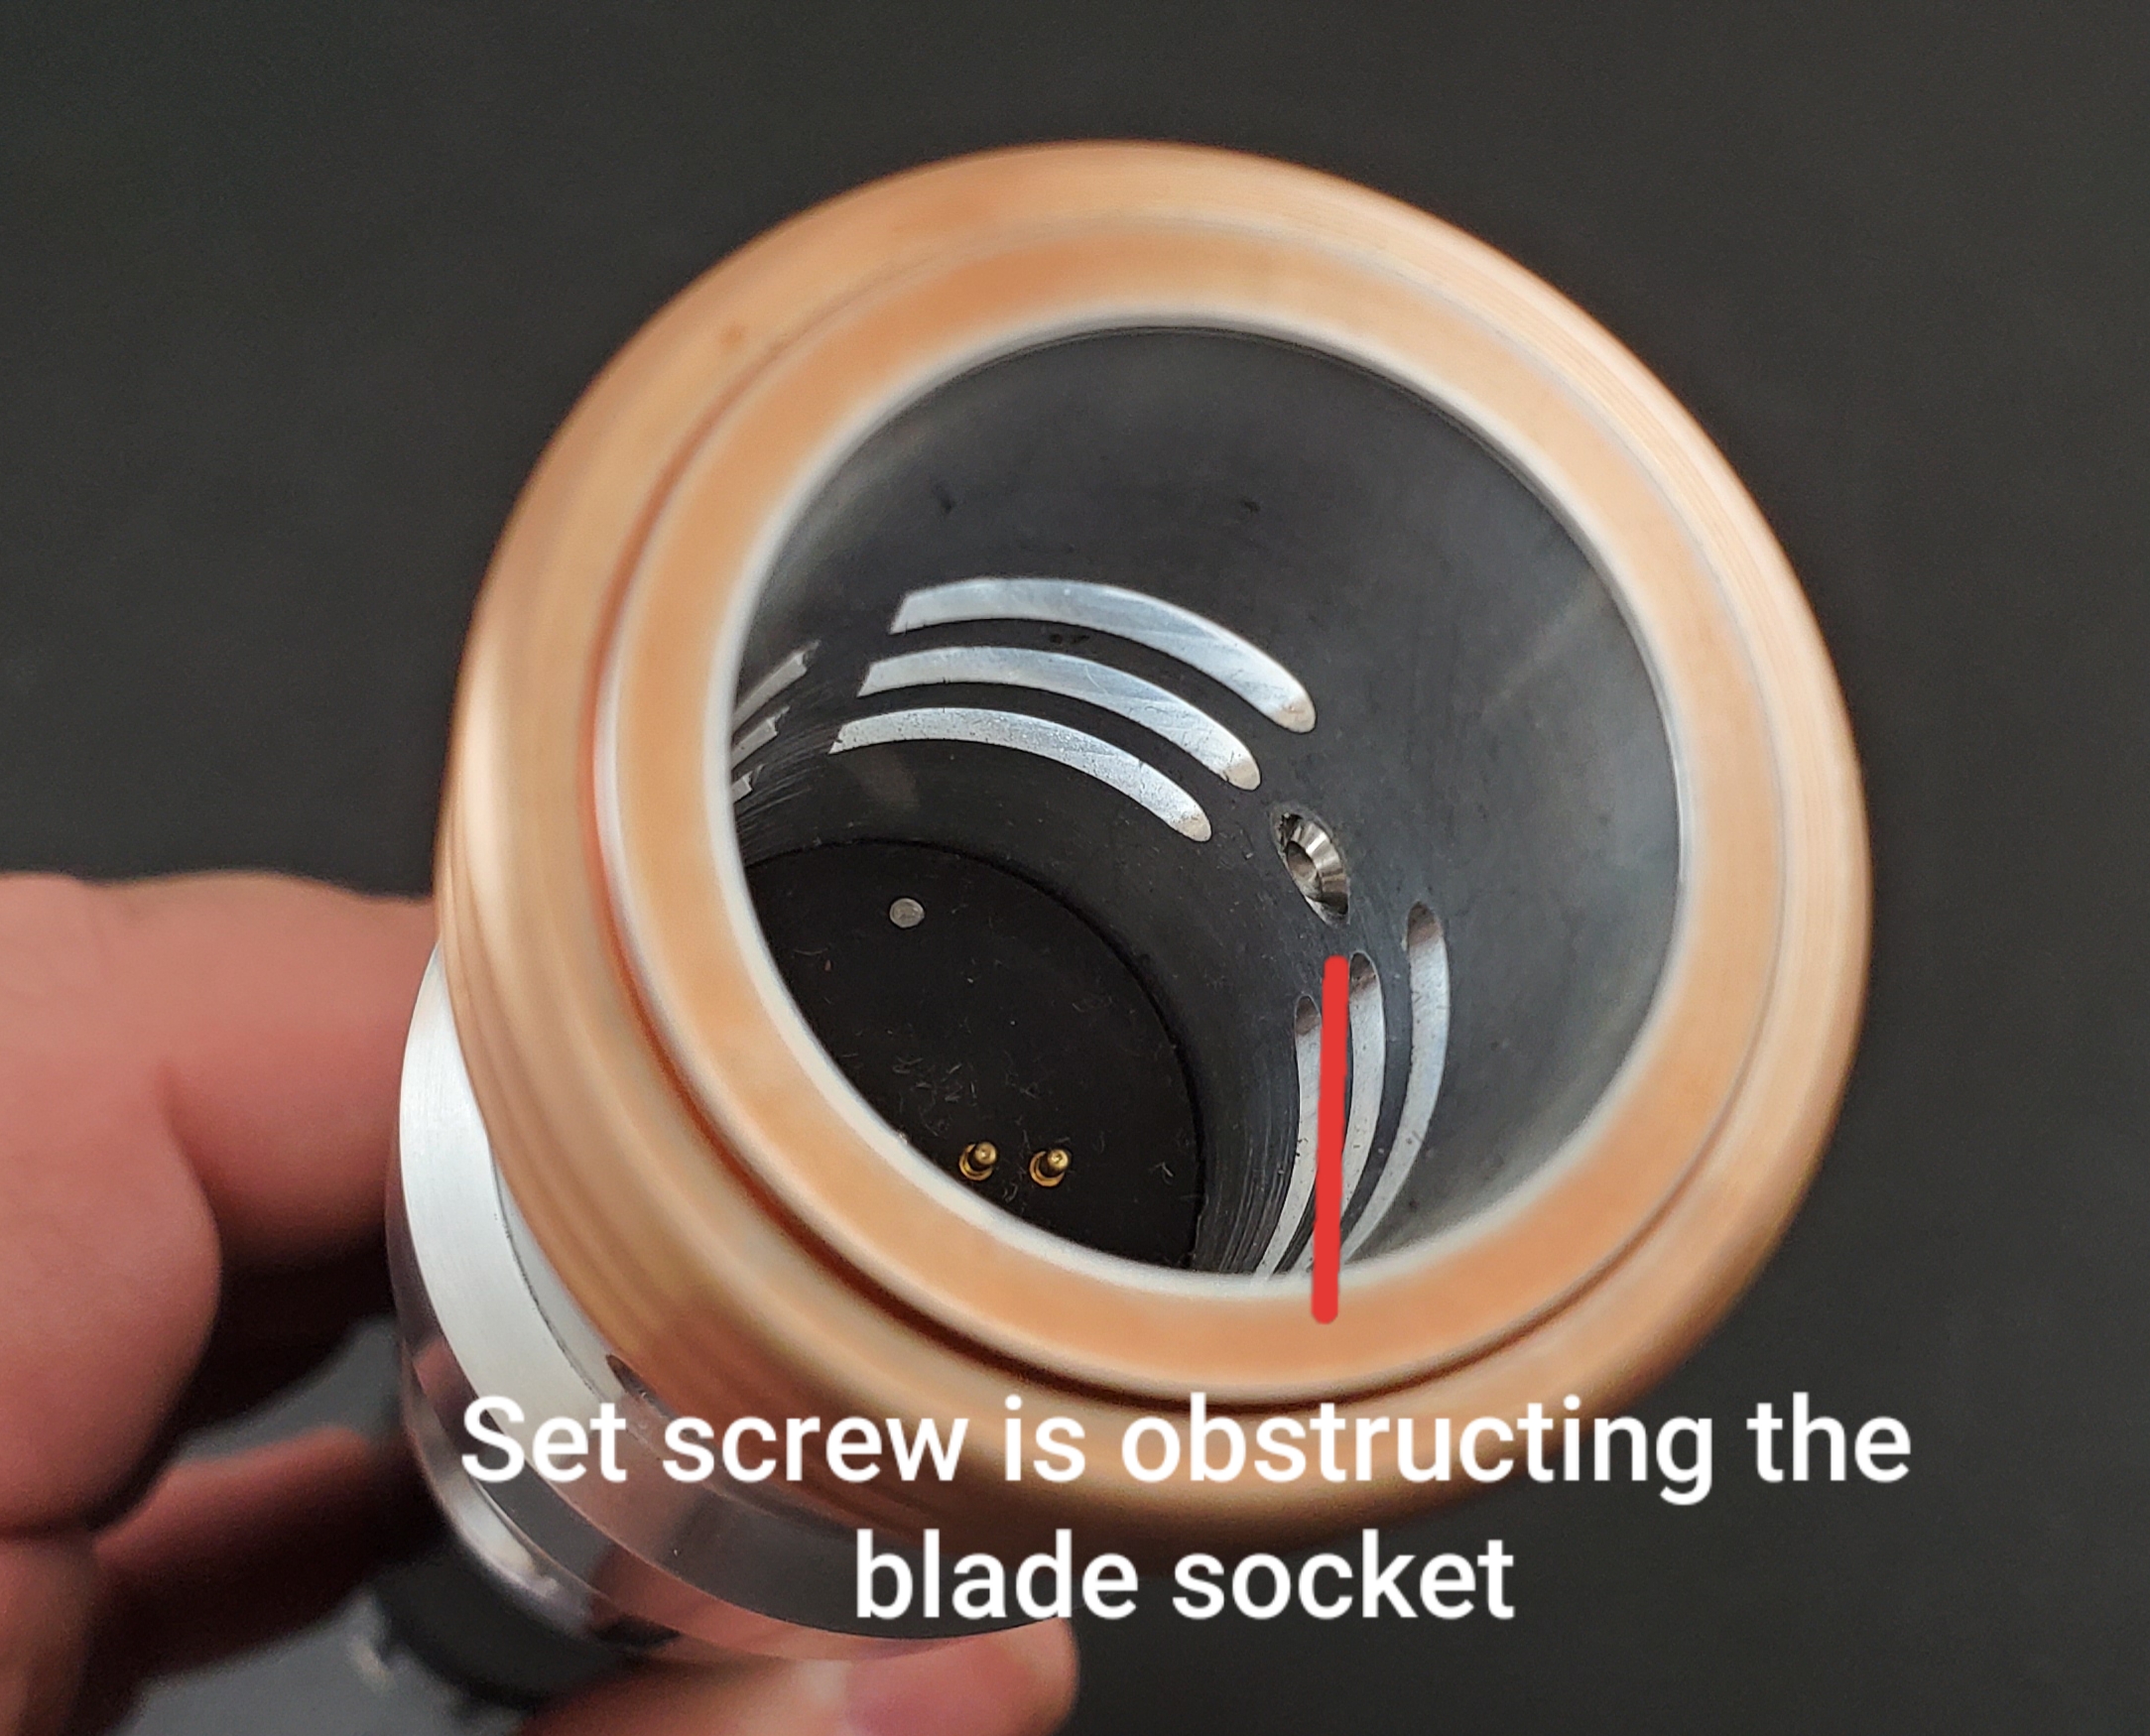
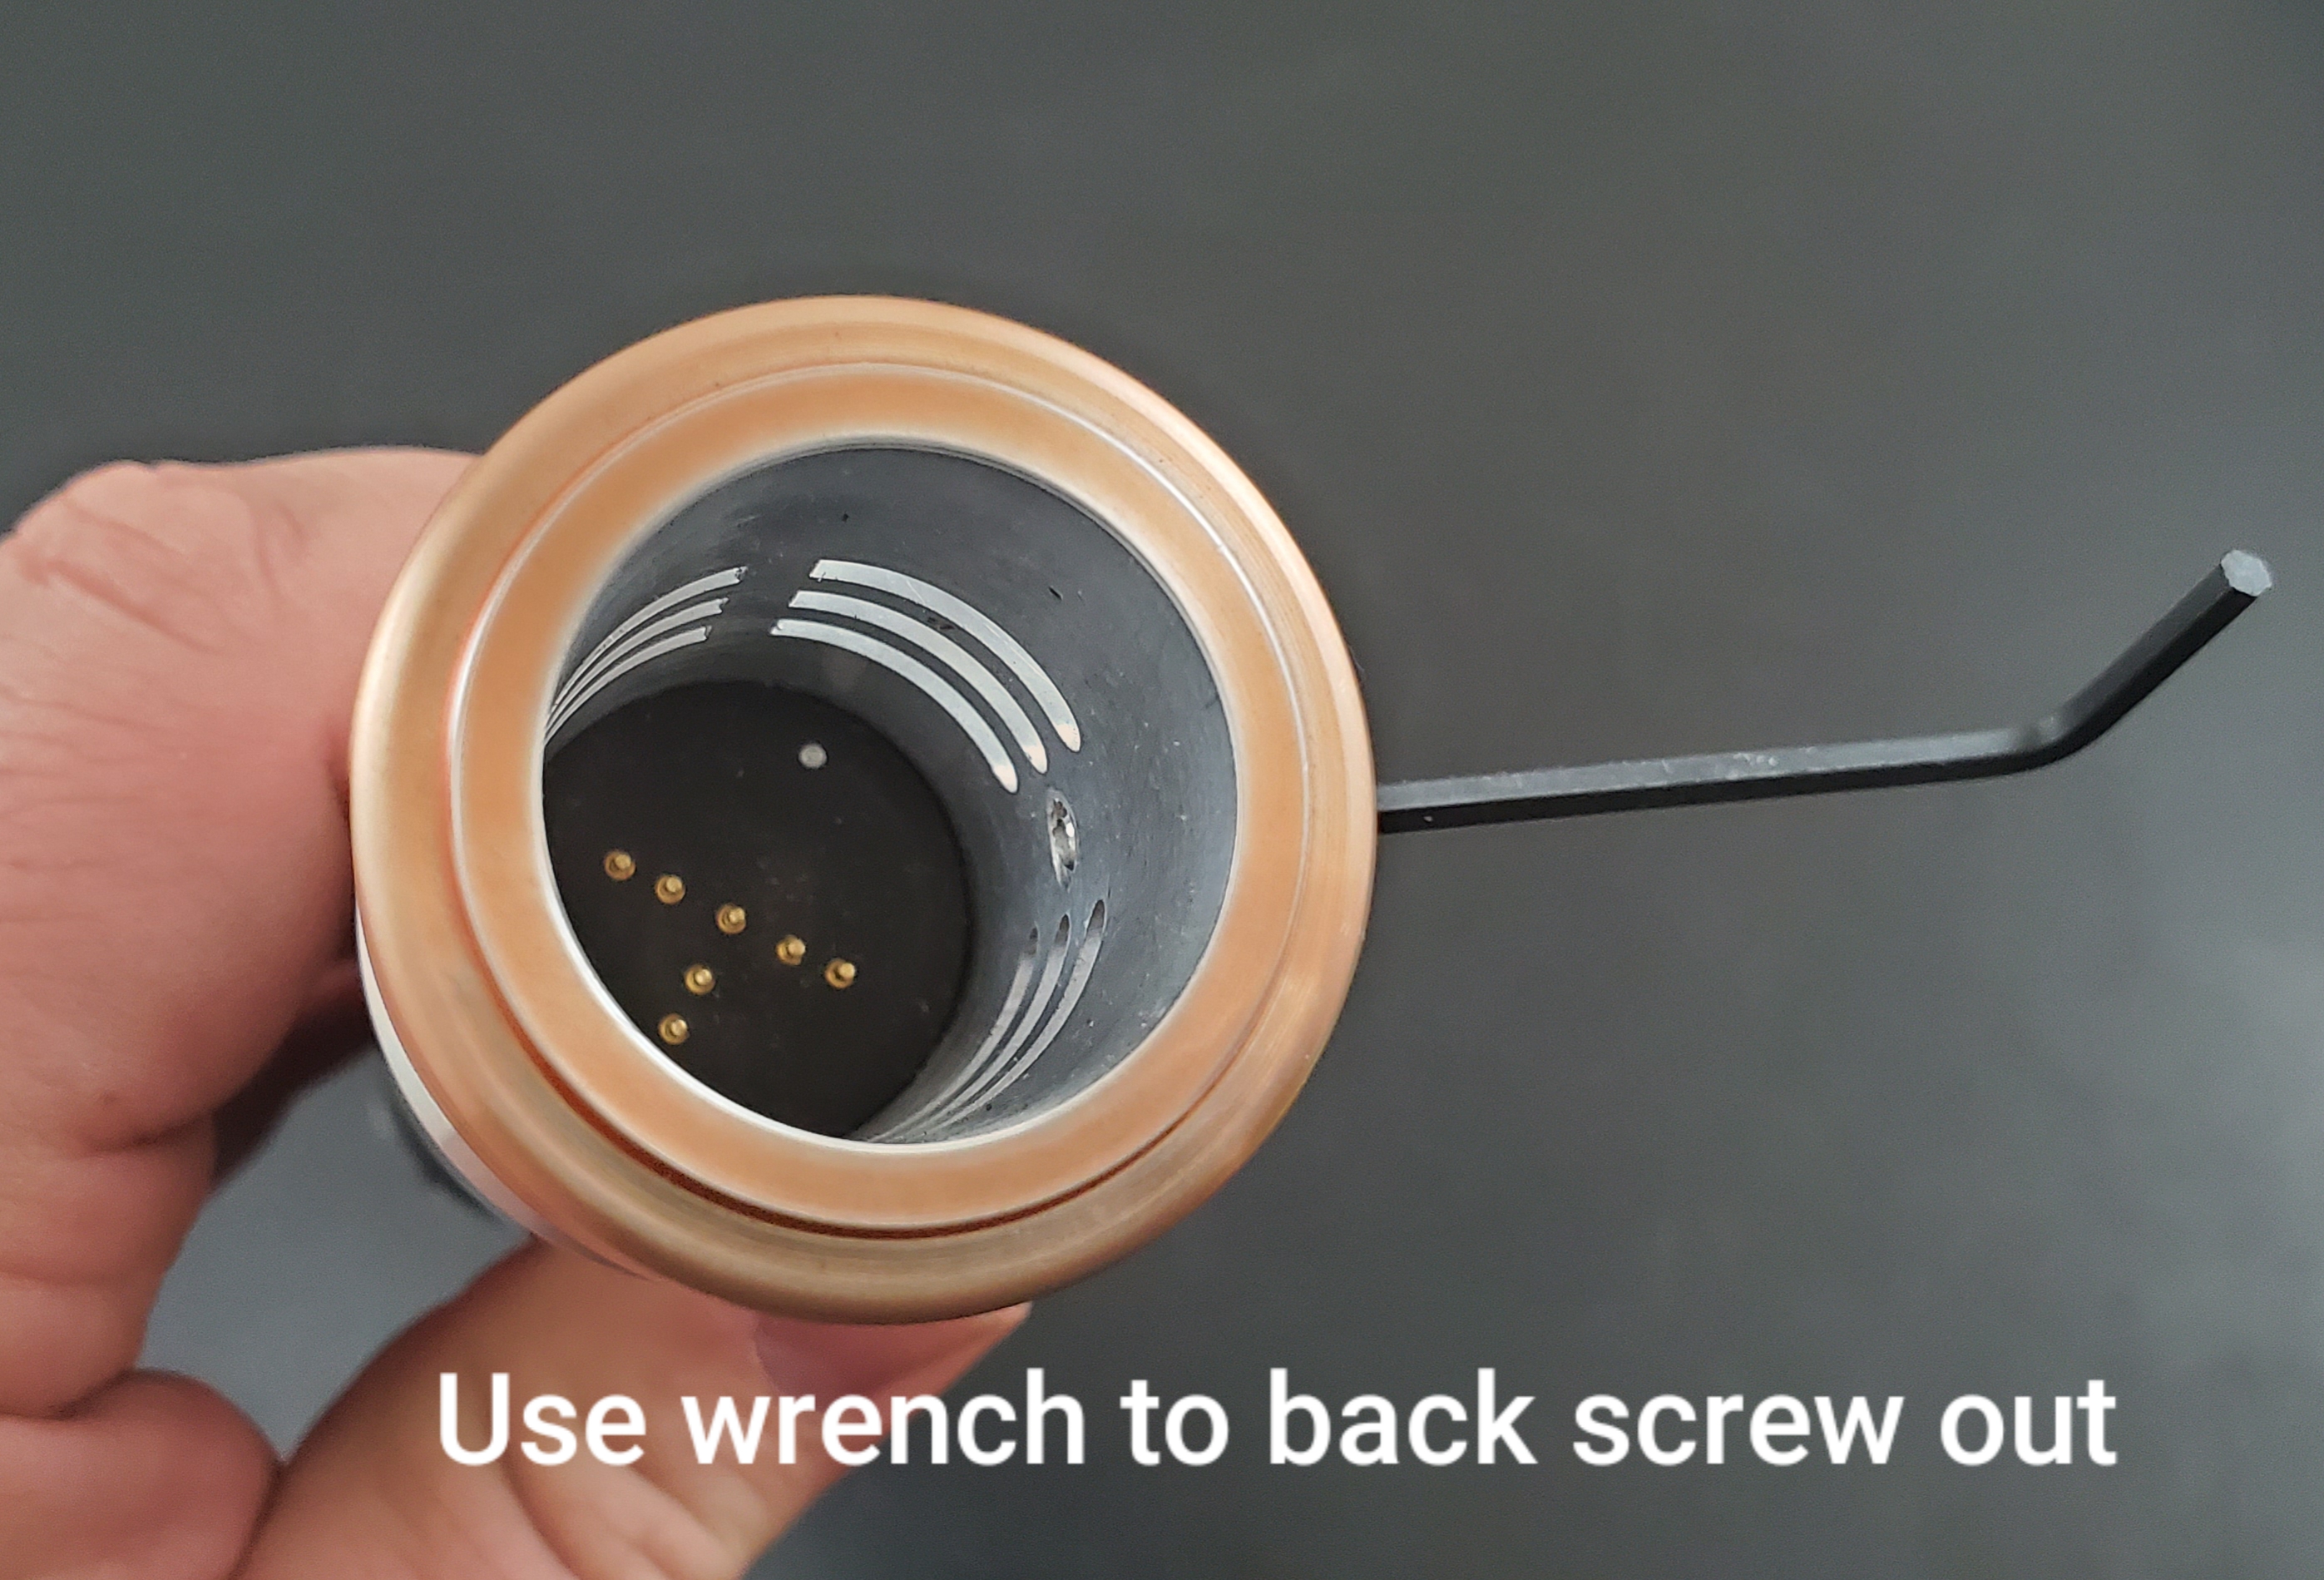
To insert your blade, remove black dust cap from blade, and use the wrench to make sure the set screw is not obstructing the inside of the emitter. You do not need to remove the screw, simply back it out enough to provide clearance. For Plecter Pixel blades, it is important the blade have good solid contact with the spring pins inside the emittter. We recommend bracing the saber against your body while inserting the blade and holding the blade in place while tightening the retention screw. Using the hex wrench, tighten the screw until you feel it make contact with the blade, then make one more 1/2 turn with the wrench. You don't want to over tighten as this will mar the blade and could lead to stripping the threads for the screw.
For Suncrusher equipped blades, remove the dust cap from the blade, there is a film used for diffusion that should not be dumped or taken out and when the blade is not in the saber use the dust cap to keep debris from getting inside. For this reason, we recommend when applicable, to place the saber on the blade, rather than the blade in the saber. This helps keep from dumping the film out unintentionally.
Chassis access:
For sabers recieved after August 2019, we have an all new chassis system and in the majority of our Combat Class sabers, this chassis is a 'fixed' system and requires removing the lower grip to access it. Not all models have access in this manner and still require the user to access it from the pommel of the hilt. Saber models with pommel access chassis are: Revanchist, Wrath, Brawler, Legionnaire.
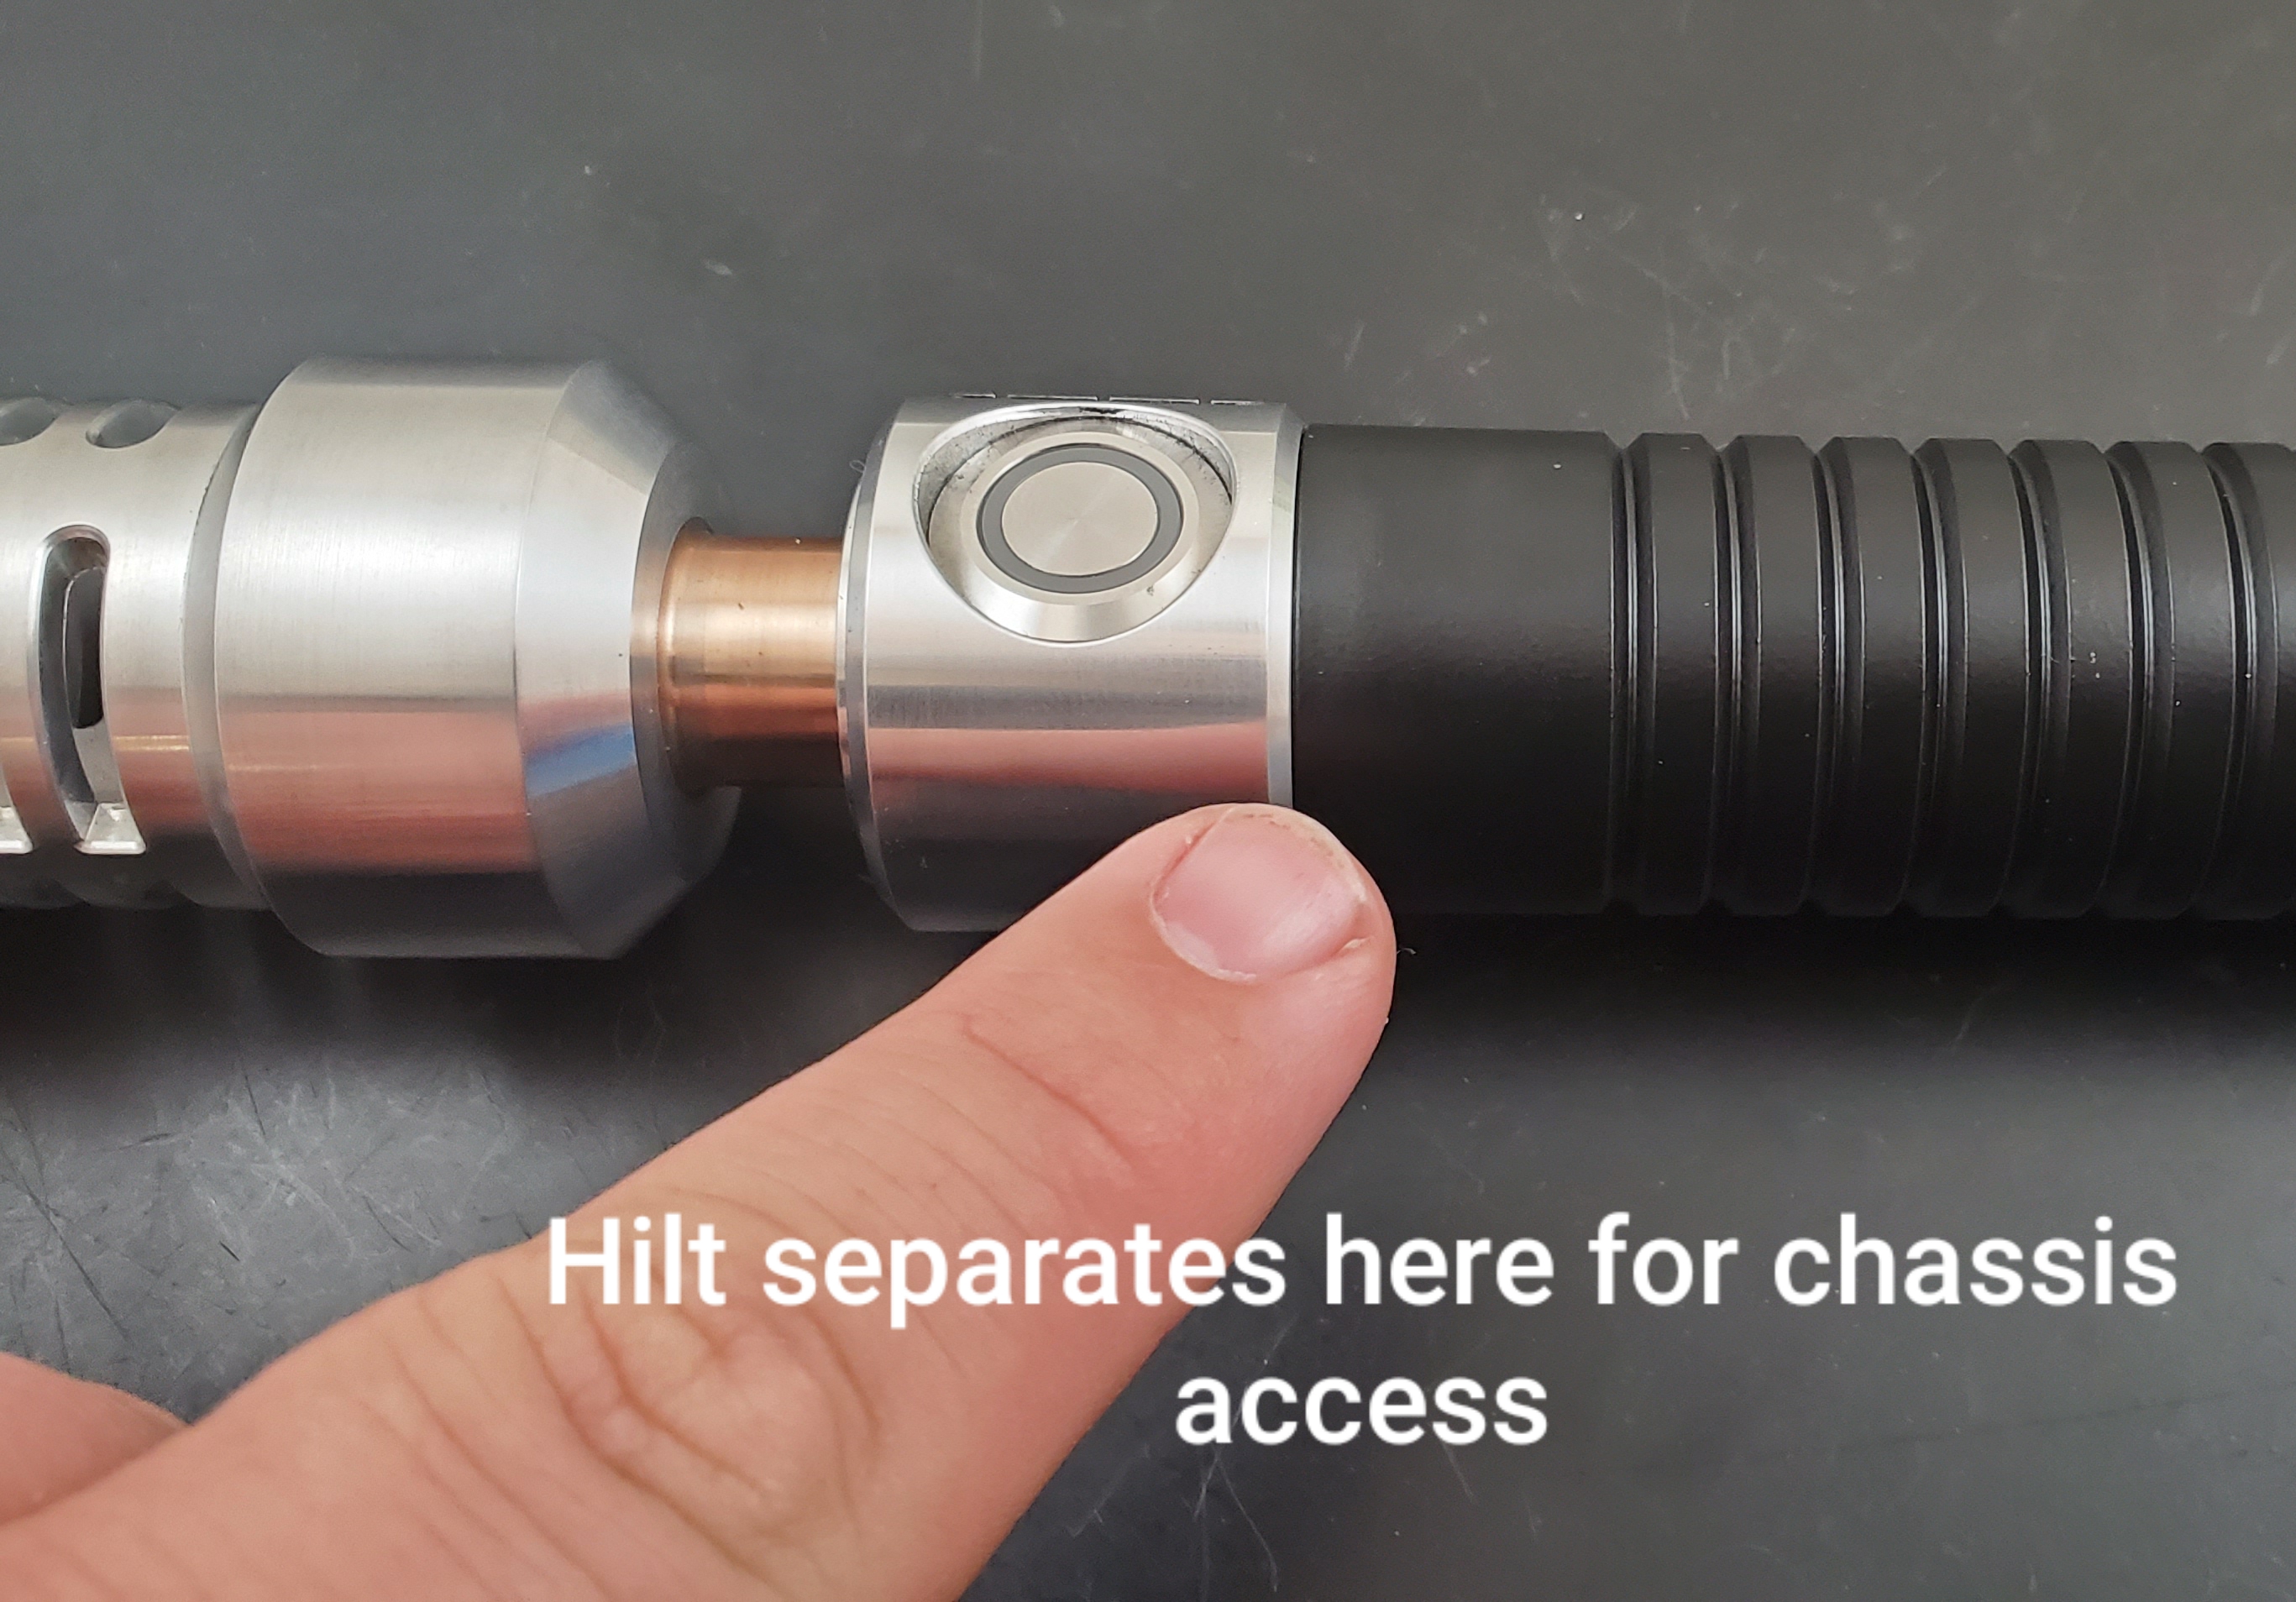

Once you have access to the chassis, you can now do things like charging your battery, plugging in the USB for computer access (or charging), SD card access etc.
Your battery:
When your battery is drained, your sound will be lower in quality with static and crackling. It is time to charge it using one of 2 methods. Your saber comes with an external battery charger that requires you to remove the battery from the chassis and place it in the external charger. To do this, you need to unscrew the speaker pod at the rear of the chassis enough for the battery to clear. *Note* You do NOT need to remove the speaker pod and it is better to not do so. Once clear, the battery can be 'rolled' out of the chassis. Place the battery in the charger with the positive side facing up. The charger will indicate a red light when charging and a green light when done. IMPORTANT: The charger has a switch on the side with a voltage selection. It needs to be on 4.2v to properly charger the battery. Once your battery has been charged, you place it back in the chassis positive side first, and towards the blade end.


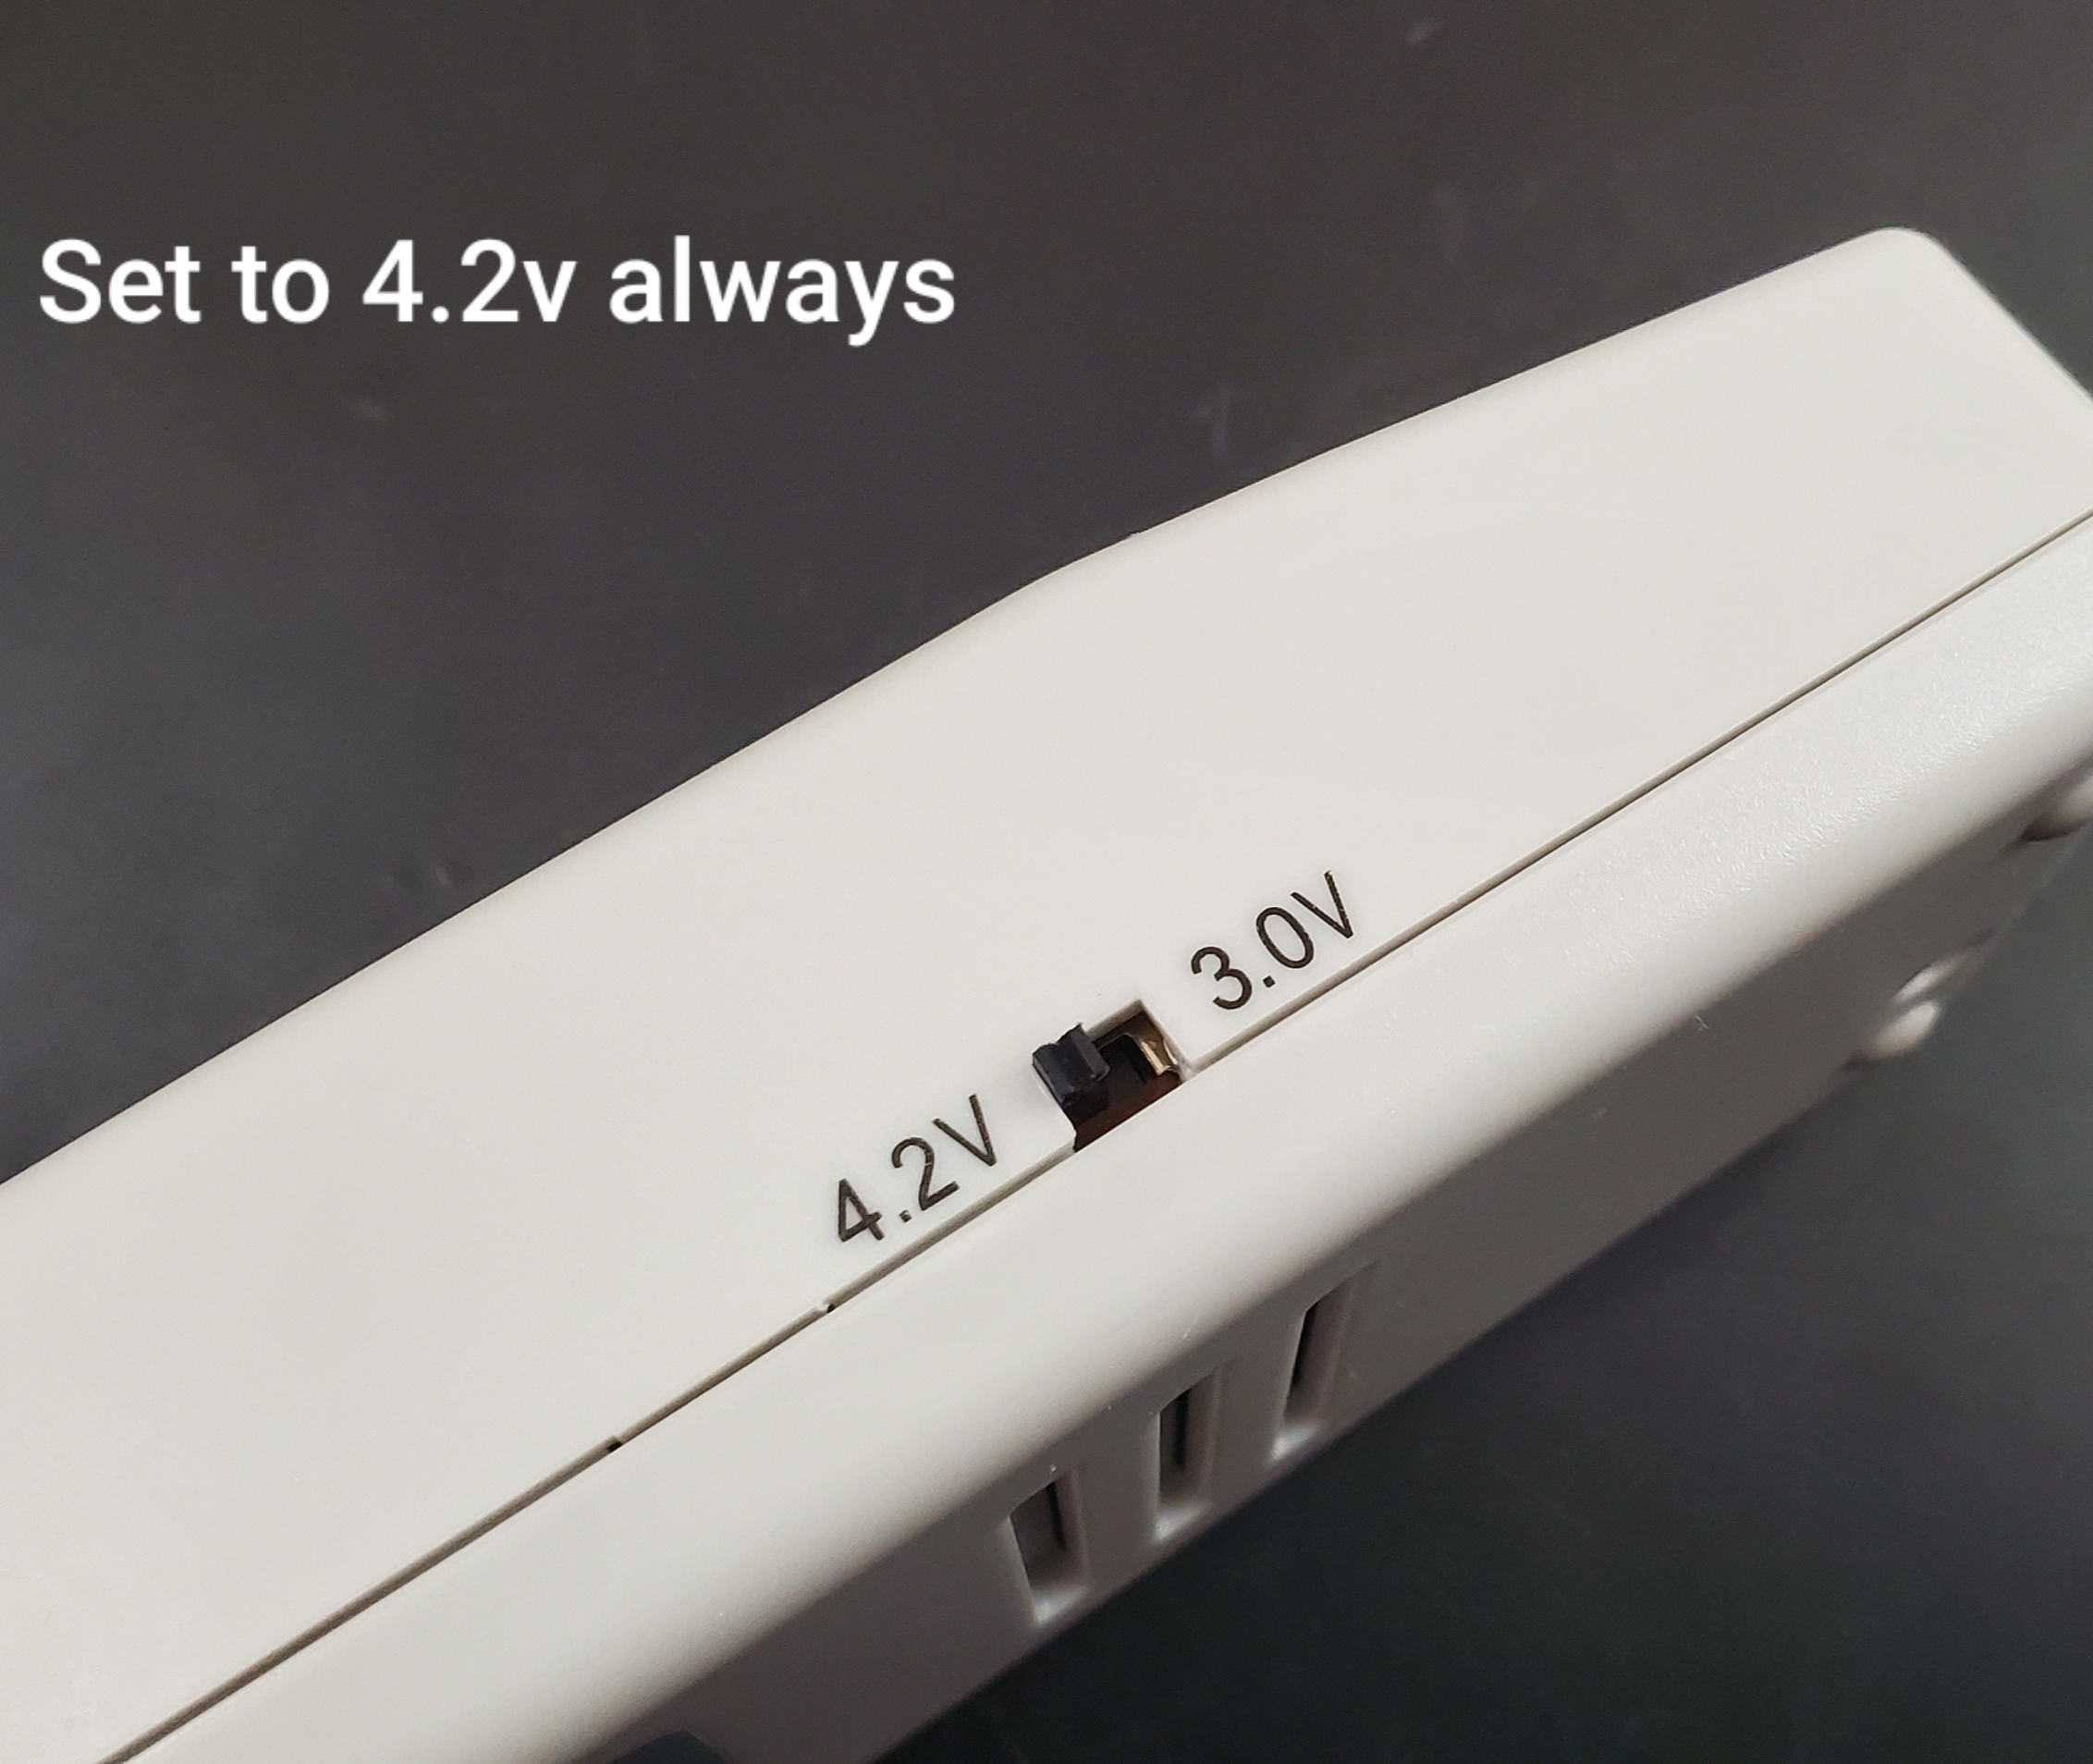

**Important** Placing your battery in backwards results in reverse polarity which can damage the saber. Always remember to place the battery in the chassis as shown.

The other method for charging your battery is to use a USB-C charging cable from either a PC or wall wart charger. For MAC users (and PC users with USB-C), you cannot use a USB-C to USB-C cable, you need the USB-C to USB-A adapter or it WILL NOT CHARGE or connect as the saber is a passive device and doesn't actively communicate with the MAC unless you use the adapter.

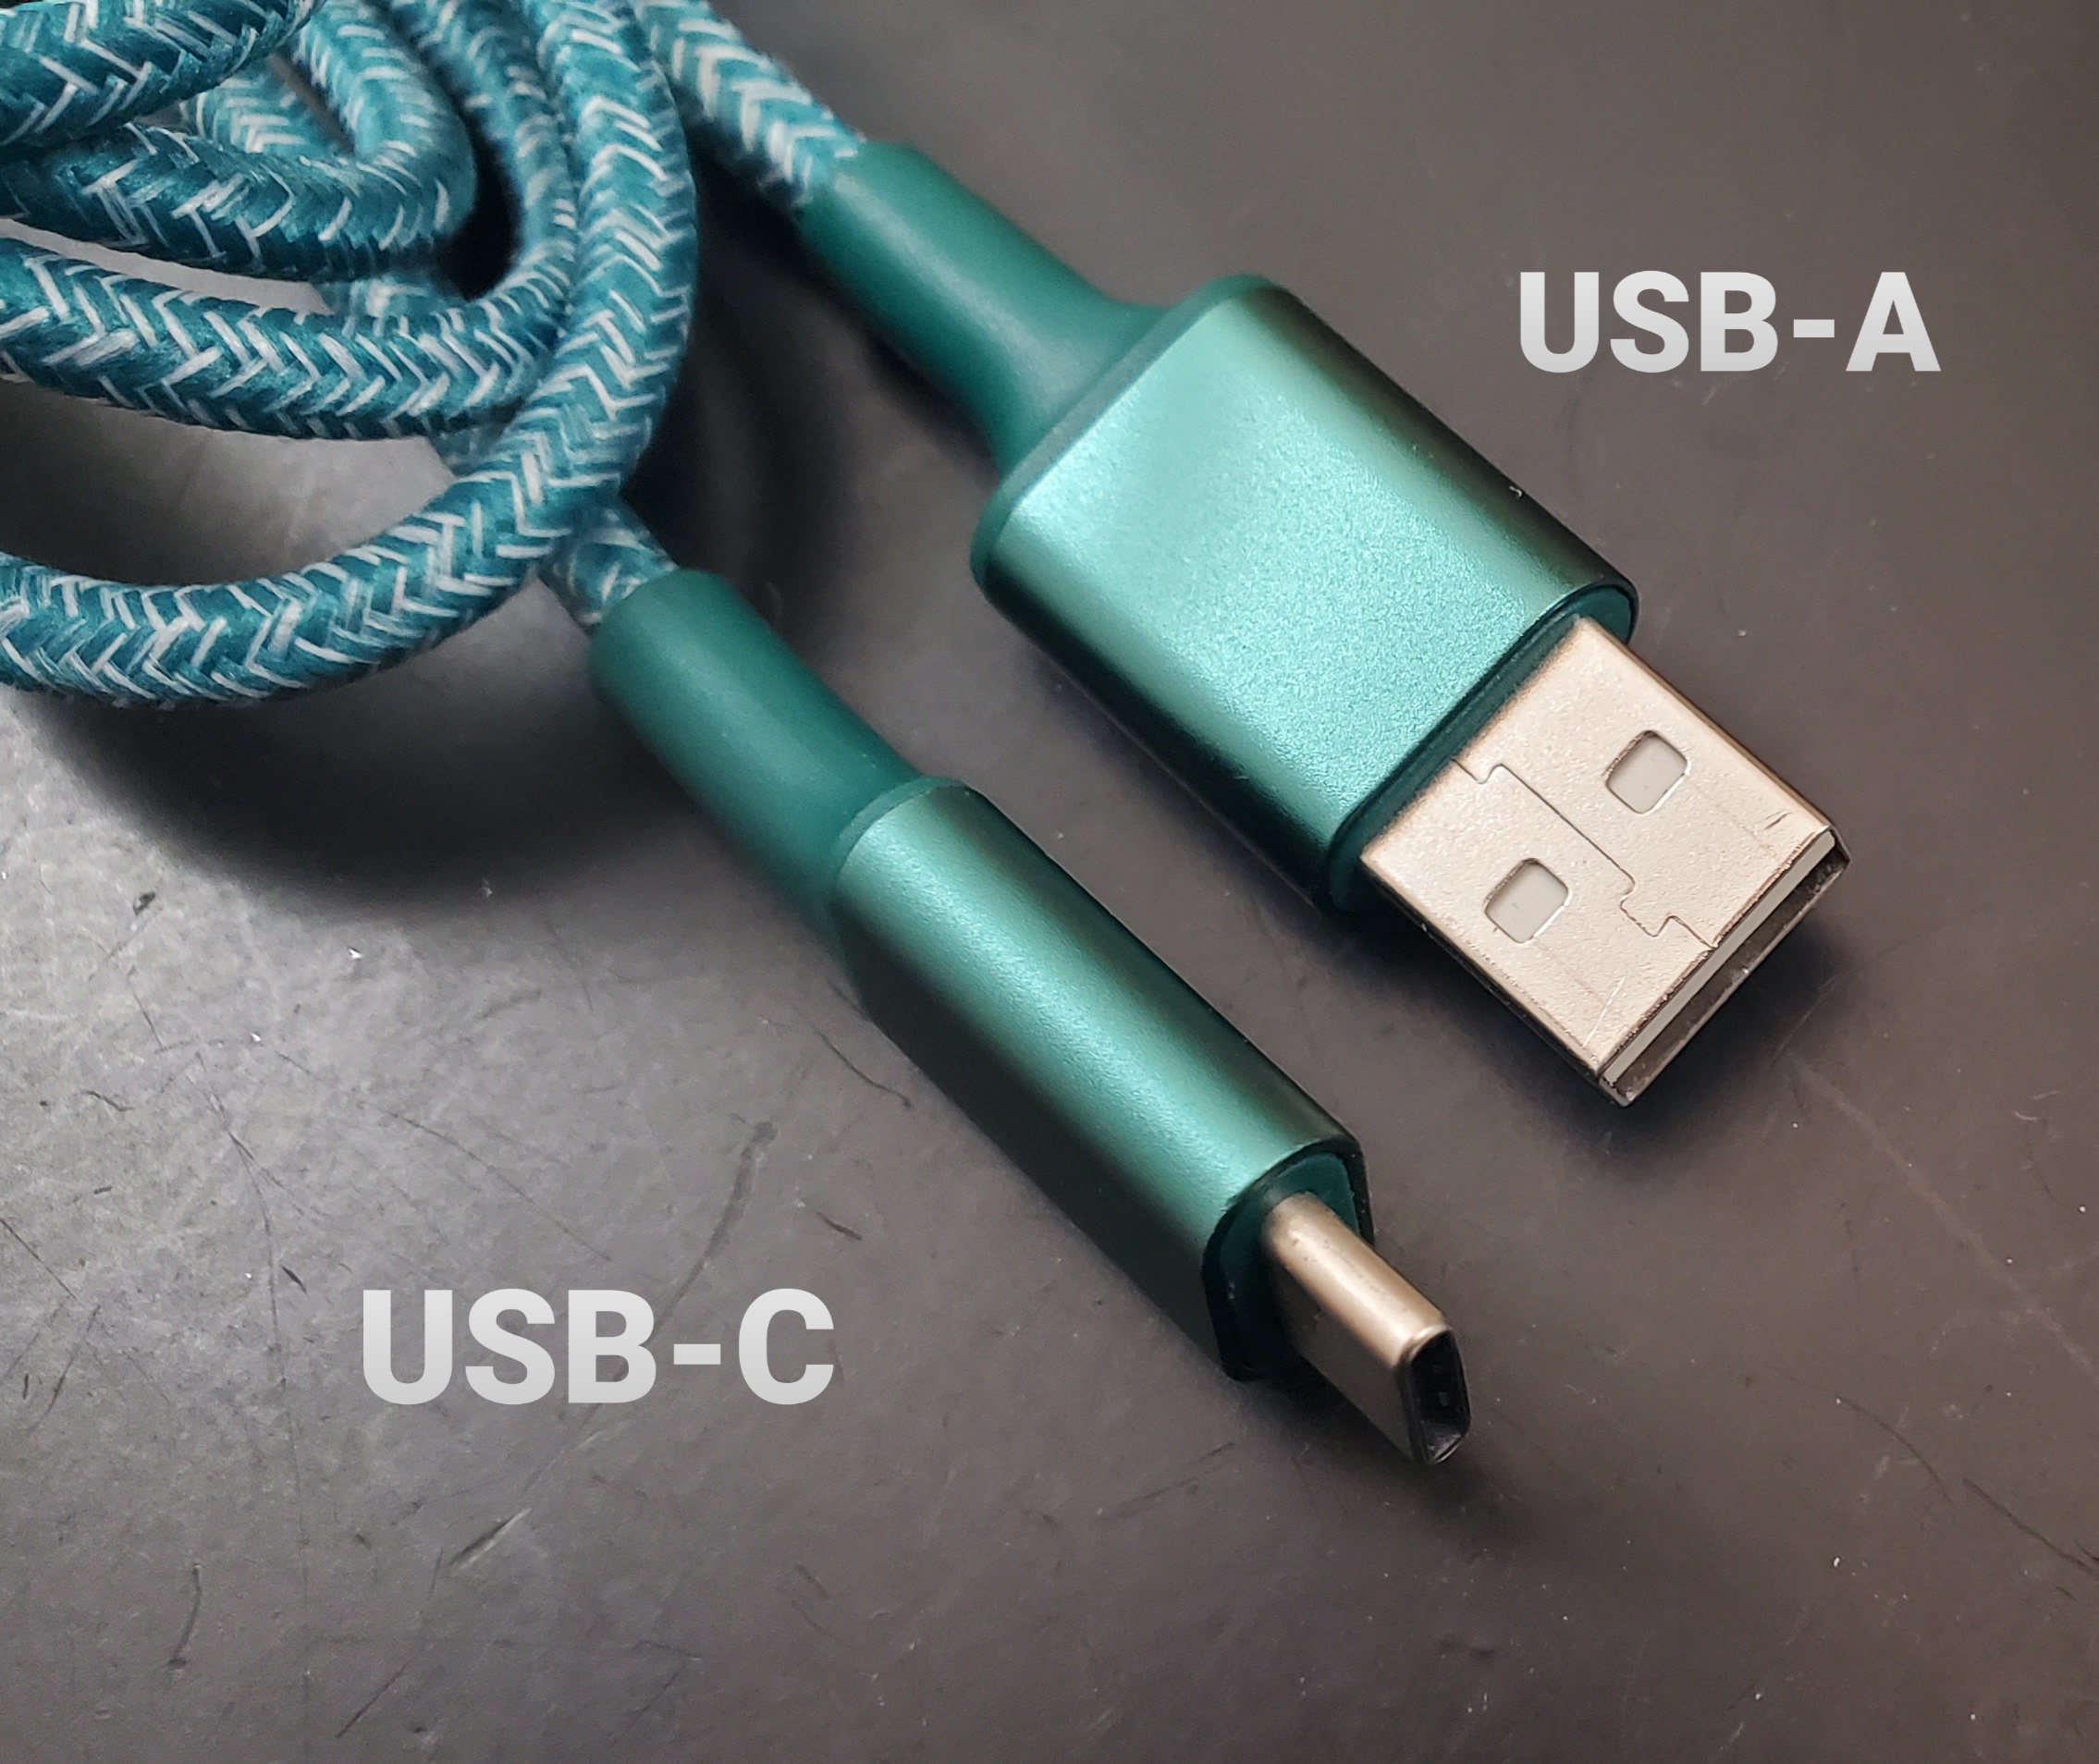
Once plugged in, you will see a blue connected light, and a red charging light that will turn green when charged.
SD Card Access:
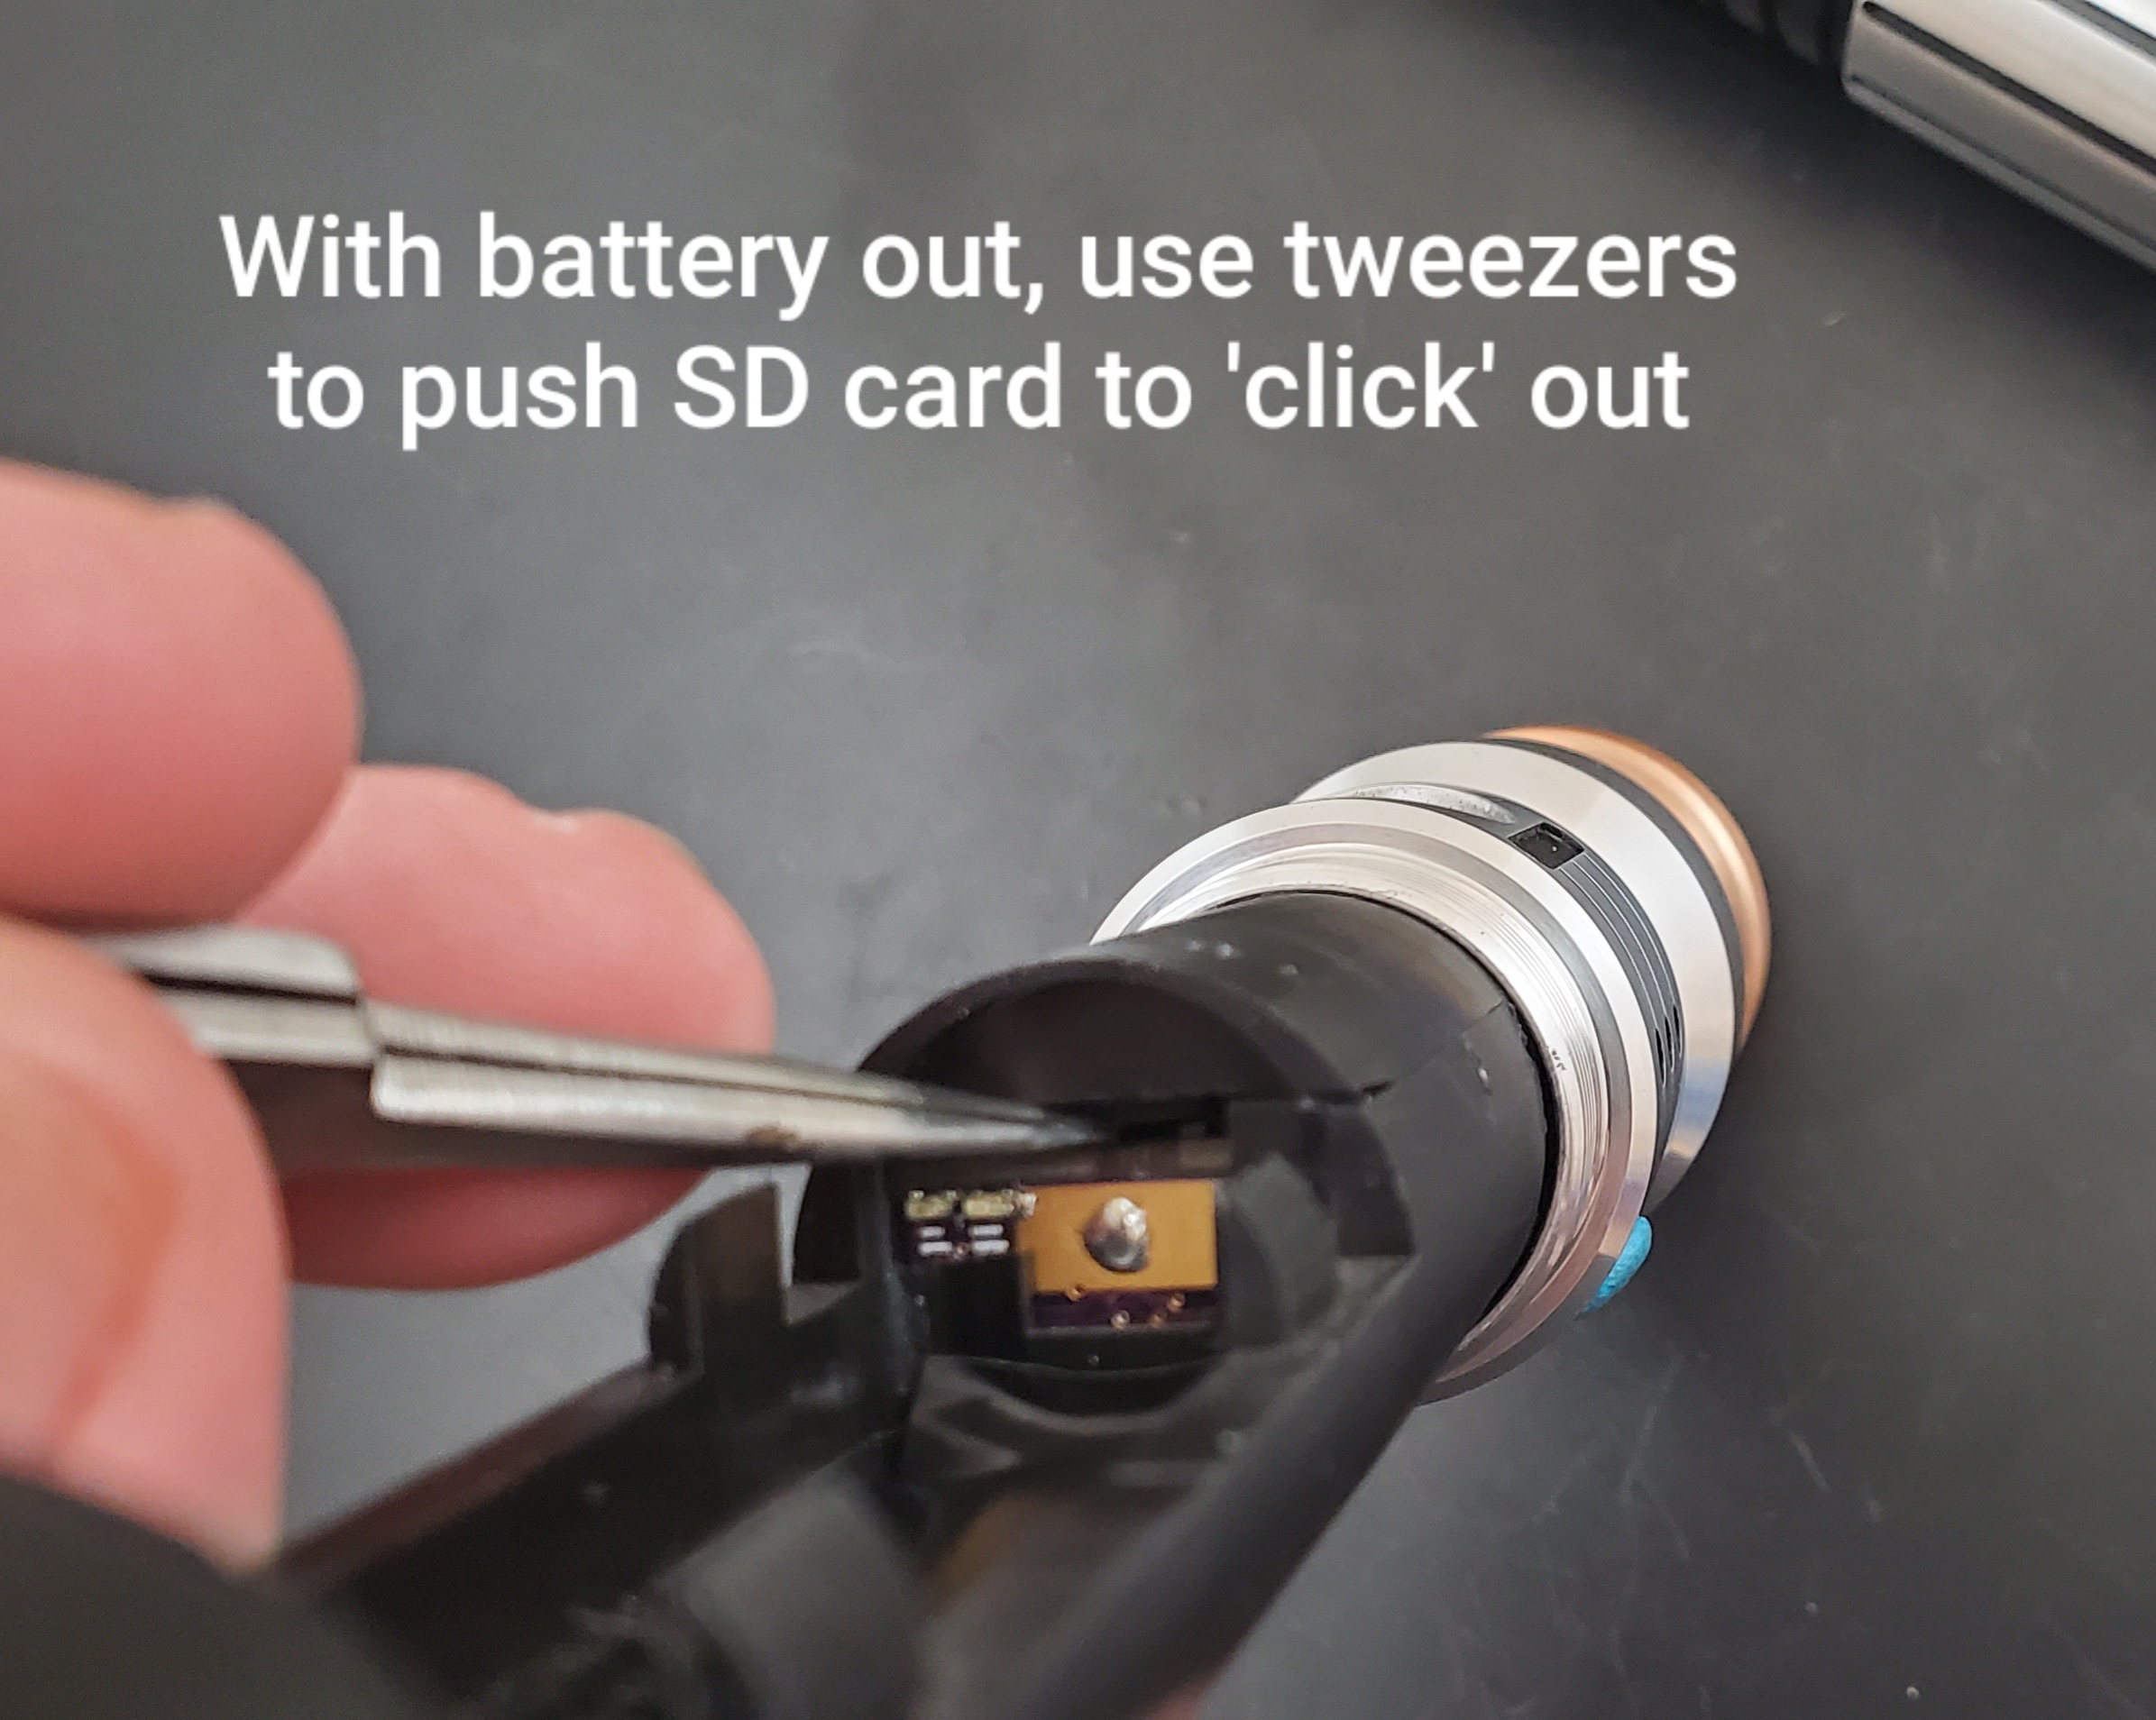
You can gain access to the SD card when the battery is removed from the chassis. You will need tweezers to push on the card clicking it 'out' and pull the card out. Then using an SD card reader make any changes, and using the tweezers carefully place the card back in and 'click' it back into place. We recommend making a backup copy of all SD card contents BEFORE making any changes.
Bluetooth:
In addition to the USB port, IF you chose the Bluetooth upgrade at the time of your order, you can use this as a wireless option for connecting your saber to a computer or other device for changing parameters. This option needed to be selected at the time of purchase as the saber does not come with Bluetooth by default. If you desire Bluetooth, your saber can be sent in for upgrade (upgrade and shipping charges apply). When you are ready to connect your saber to a computer or other device, you need to make sure the saber is either on, or in idle mode (not in deep sleep). When looking for the saber on your computer, it may show as "Unknown Device" until it pairs. It can show up with the model name and invoice number of the saber e.g. "REVN21909" In either case, when prompted for the PIN number it will be 113811. Once paired, you may connect to the Plecter Labs RICE program, or ForceSync app using instructions for those programs found by the creators.


